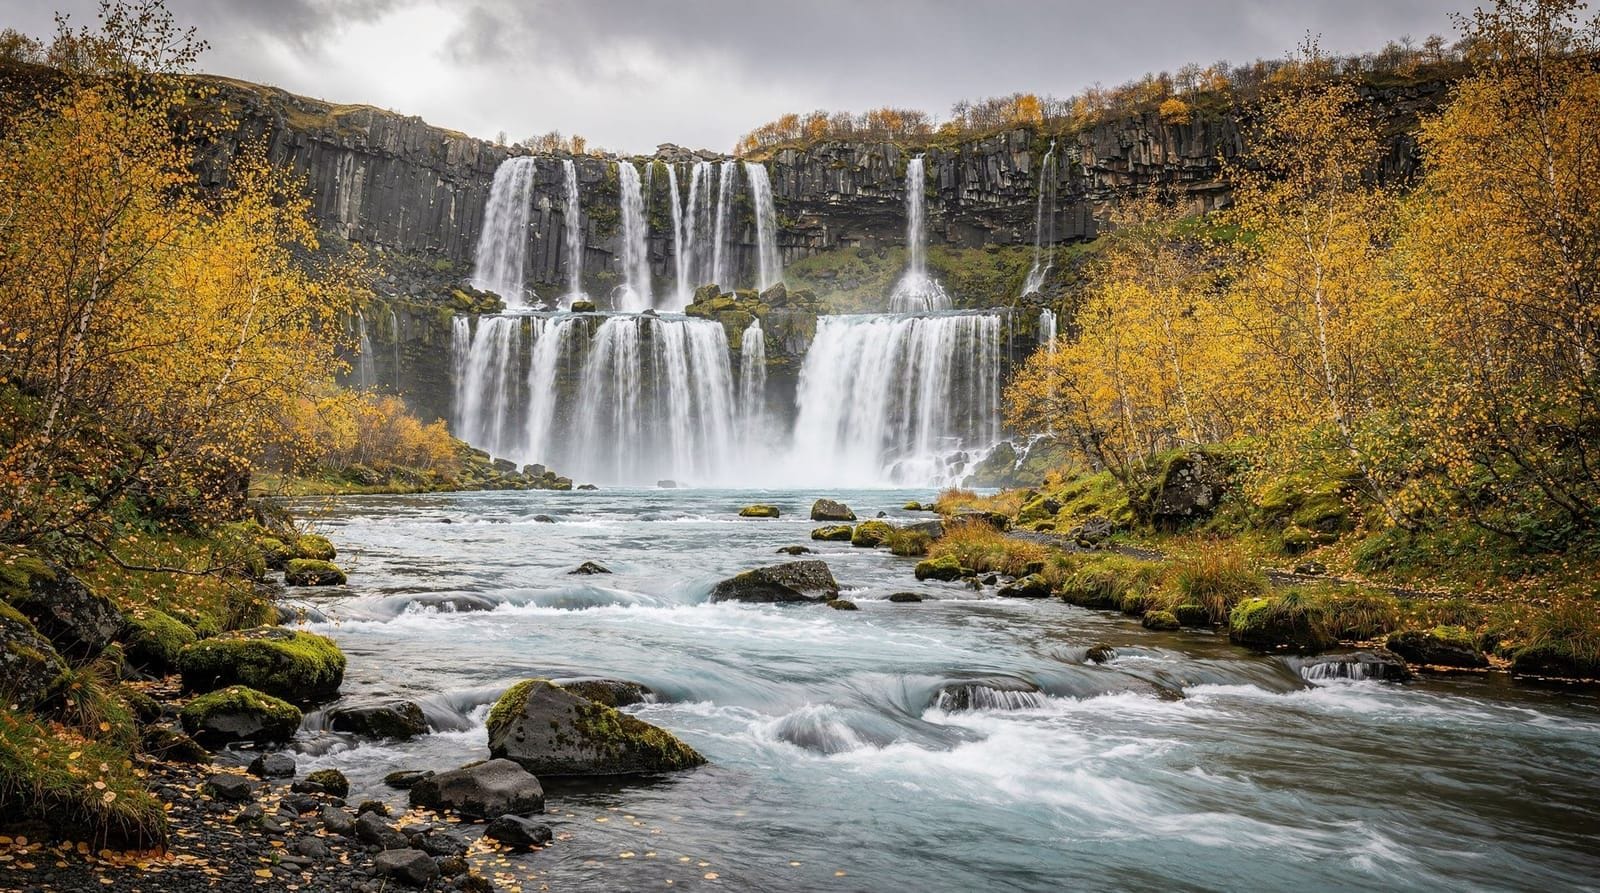
Long-exposure waterfall photography in Iceland — technique and locations
What settings should I use for long-exposure waterfall photography in Iceland?
For a silky-smooth waterfall effect: ISO 100, f/8–f/11, and 1–4 seconds for most daylight conditions. Use a 6-stop ND filter (ND64) for bright conditions, 10-stop (ND1000) for very bright midday shooting. In overcast conditions you may not need an ND filter at all — the flat light naturally allows 0.5–2 second exposures at base ISO with aperture at f/11.
Why Iceland is exceptional for waterfall photography
Iceland has more photographs waterfalls per accessible kilometre than anywhere in Europe. The combination of factors that produce great waterfall images — high water volume, dramatic geological settings, accessible viewpoints, and reliable overcast light — comes together repeatedly along the Ring Road and on side roads accessible with a standard rental car.
The overcast light deserves special mention. Iceland’s maritime climate produces frequent cloud cover that landscape photographers generally dislike. For waterfall photography, diffuse overcast light is actually ideal: it eliminates harsh shadows, reduces contrast to a manageable range, and allows longer exposures without overexposure. Iceland’s grey weather is your friend at waterfalls.
The physics of waterfall long exposures
Water in motion creates blur in long exposures. The degree of blur — from slightly smoothed to fully featureless and silky — depends on:
- Shutter speed: longer = more blur. Below 0.3 seconds, water shows some texture. Above 2 seconds, most water looks fully smooth.
- Water speed: a fast, high-volume waterfall like Dettifoss blurs at shorter exposures than a slow cascade. A 1-second exposure at Dettifoss produces the same visual blur as a 3-second exposure at a smaller fall.
- Distance: standing close to fast water that fills the frame requires shorter exposures for the same effect than shooting the same waterfall from far away.
There is no single “correct” exposure. The artistic choice between a textured and a silky effect is personal. Shoot multiple exposures at different shutter speeds and decide in post-processing which version serves your vision.
Equipment setup
Camera
Any camera with manual exposure control. Mirrorless and DSLR both work equally well for static long-exposure work. Make sure you can disable in-camera image stabilisation (IBIS) when the camera is on a tripod — IBIS actively moving while the camera is static can introduce subtle shake in very long exposures.
Tripod
Non-negotiable. Hand-holding at 1 second produces blurred images. Use all three tripod legs, spread wide. Extend the legs to the minimum height required for your composition — lower is more stable. If the ground is soft or uneven (common near waterfalls), press the legs firmly in until they are stable.
Carbon fibre vs. aluminium: Carbon fibre is lighter and less cold to touch in winter. Aluminium is heavier and less expensive. Both are adequate. A cheap carbon fibre tripod (under €100) may have a flimsy ball head that wobbles — the head is as important as the legs.
Filters
Neutral Density (ND) filters: Reduce light entering the lens without affecting colour.
- ND4 (2 stops): minimal effect, useful in dull conditions to extend exposure slightly
- ND64 (6 stops): the standard waterfall filter, converts a 1/100 s daylight exposure to approximately 0.6 s
- ND1000 (10 stops): converts a 1/100 s exposure to approximately 10 s; useful for midday shooting in bright conditions
- Variable ND: a single filter adjustable from 1–10 stops; convenient but introduces colour cast at high settings
Circular Polariser (CPL): Removes glare from wet rocks, enhances water and sky colour. A fundamental filter for Iceland waterfall work.
Filter format: Screw-on circular filters are convenient. Square filter systems (Haida, Lee, NiSi) allow graduated ND and easy filter swapping. For travel photography, screw-on circular filters in the primary thread size of your lens are the simplest choice.
Remote shutter release
A cable release or remote trigger eliminates vibration from pressing the shutter button. An alternative: use the camera’s 2-second self-timer. The timer delay allows vibration from pressing the shutter to dissipate before the exposure begins.
Step-by-step shooting process
-
Compose the shot: Position the tripod, frame the image, and lock the ball head. Check the horizon line is level using the camera’s built-in level display. Take note of any spray patterns — avoid compositional elements that will be blurred by spray.
-
Set base settings: ISO 100, aperture f/8 or f/11, shutter speed to Auto initially. Take a test shot without an ND filter to evaluate exposure at your base settings.
-
Calculate the ND filter requirement: If your test shot at f/11, ISO 100 is correctly exposed at 1/100 s, and you want a 1-second exposure, you need approximately 7 stops of ND. An ND64 (6 stops) gives you approximately 0.6 seconds — close enough. An ND128 (7 stops) gives you exactly 1 second.
-
Attach the ND filter: If using a dark filter (ND1000), autofocus before attaching the filter and then switch to manual focus — the camera cannot autofocus through a 10-stop filter.
-
Dial in the ND-adjusted shutter speed manually: Switch to manual exposure mode. Set the shutter speed to your calculated target (0.5–4 seconds for most situations). The exposure should be correct if your calculation is accurate — check the first result and adjust.
-
Use the 2-second timer or remote release: Trigger the shutter remotely or use the built-in timer delay.
-
Check and adjust: Review the histogram. A good waterfall exposure has detail in both shadow (dark rocks) and highlights (bright water) without either being clipped. Adjust shutter speed or aperture if needed.
Iceland’s best waterfalls for long-exposure photography
Skógafoss
Character: Tall (60 m), wide, consistent volume year-round. The cliff face on the right side has stairs to an elevated viewpoint.
Access: Route 1, 149 km east of Reykjavík. Large free carpark. Accessible year-round.
Best position for long exposure: At the base, approximately 30 m back from the falls. This gives a full-height view of the falls with the river in the foreground. Mist spray is manageable at this distance with a lens cloth.
Ideal conditions: Overcast light (avoids harsh shadow on the cliff face). Morning (before bus tours, before 09:00). Winter for dramatically reduced crowds.
Tip: The elevated viewpoint reached by the stairs gives a different perspective — looking down the river valley rather than up at the falls. This angle works well at golden hour when warm light fills the valley.
Seljalandsfoss
Character: Narrower than Skógafoss but unique — a walk-behind path (open summer only) gives access to the falls from behind.
Access: Route 1, 126 km east of Reykjavík. Parking fee 700 ISK. Open year-round; behind-the-falls path open summer only.
Photographic conditions: The falls face west, making late afternoon and sunset the best light. The surrounding cliff forms a natural frame. From behind: backlit water curtain with the exterior landscape visible through the falls.
Long-exposure note: From behind the falls, exposure times of 1–2 seconds produce a glowing water-curtain effect. The light level inside the cave is lower than outside, allowing longer exposures without ND filters in some conditions.
Safety: The path behind the falls is icy in winter. Do not attempt it if ice is present.
Dynjandi
Character: Iceland’s most photogenic waterfall system — a 100 m tiered cascade tapering from a wide top to a narrow base, with five smaller falls in the approach. In a remote Westfjords setting with virtually no other visitors.
Access: Route 60 in the Westfjords. Accessible late May to October. 4WD recommended in early season. 3-hour drive from Reykjavík.
Long-exposure note: The approach walk (20 minutes from the parking area) passes each of the smaller falls — each is a separate long-exposure subject. The main falls are best photographed from the wide platform at the base, where the entire height is visible.
Why it’s worth the journey: No tour buses, no crowds, a genuinely wild setting. The effort to reach it filters out casual visitors, making the location feel properly remote.
See Dynjandi guide.
Dettifoss
Character: Brutal. Europe’s largest waterfall by volume. 44 m high, 100 m wide, grey glacial water. The raw power is more geological than scenic.
Access: North Iceland, Route 862 or 864 from Route 1. Gravel roads, 4WD recommended for Route 862.
Long-exposure note: The volume and speed of Dettifoss means that even 0.5-second exposures produce significant blur. 1-second exposures at f/11 in overcast light look fully smooth. The challenge is managing spray — the mist extends 100 m from the falls. Front element protection is essential.
Best light: Overcast. Direct sun creates too much contrast between the white water and dark basalt.
Godafoss
Character: Wide (30 m), semicircular, clear blue-green water. More photogenic and more approachable than Dettifoss.
Access: Route 1 near Akureyri. Free carpark on both banks. Year-round access.
Long-exposure note: The east bank gives the most photogenic angle. The semicircular falls photograph well at f/11, 2 seconds from a gravel beach foreground at river level.
See Goðafoss guide.
Skaftafellsfoss and Svartifoss
Character: Svartifoss in Skaftafell is Iceland’s most distinctive waterfall — surrounded by perfectly geometric hexagonal basalt columns that create a cathedral-like frame.
Access: Skaftafell visitor centre car park (800 ISK per day). 45-minute walk from the car park. Open year-round.
Long-exposure note: Svartifoss is narrow and relatively low-volume. 2–4 second exposures at f/8 produce good results. The basalt column columns provide a strong vertical foreground element that works with a wide-angle lens.
Common mistakes
Dirty front element: The most common reason for soft or spotted waterfall images. Check the front element before every shot. A single water droplet ruins the frame.
Ignoring the horizon: Wide-angle lenses exaggerate horizon tilt. Always check the bubble level or electronic level before long exposures.
Too long in high-water season: In Iceland’s summer, waterfalls run at maximum volume and the water is very fast. The same shutter speed that produces silky water in autumn may over-blur in summer. Test multiple exposures.
Underexposed rocks: Dark basalt rocks in shadow near bright waterfalls require either shadow lifting in post-processing or a graduated ND filter to balance the exposure. Check your histogram — clipped blacks are recoverable in RAW but require care.
Post-processing waterfall RAW files
Long-exposure waterfall photographs from Iceland require specific post-processing approaches because the subject combines extreme contrast ranges, fine water texture detail, and often challenging mixed lighting. A systematic RAW workflow addresses these issues more effectively than broad adjustments.
Step 1: Correct exposure and set tone curve. Iceland waterfall exposures frequently show clipped highlights in the bright water centre and blocked shadows in the dark surrounding basalt. In Lightroom, pull Highlights to -50 to -80 to recover the water structure. Lift Shadows to +40 to +70 to reveal rock texture. The resulting image may look flat (reduced contrast) — this is correct and will be addressed in the tone curve. Apply a gentle S-curve that adds contrast back to the midtones without re-clipping the extremes.
Step 2: Noise reduction. Long-exposure waterfall shots at ISO 100 in daylight have minimal luminance noise. However, long exposures (8+ seconds) can produce “hot pixels” — bright single-pixel spots that appear in dark areas of the frame. Enable long-exposure noise reduction in-camera or apply Lightroom’s Detail panel Luminance slider at 20–30 to remove these without affecting overall sharpness.
Step 3: Remove colour cast from ND filters. Variable ND filters and some lower-cost fixed ND filters introduce a colour cast — typically blue-magenta at high densities. This shows as a tinted water area (the most neutral-toned element in the image). Use the White Balance Selector tool in Lightroom, clicking on the white water at the centre of the falls, to neutralise the cast. Alternatively, adjust the Temperature and Tint sliders manually until the white water looks neutral grey-white.
Step 4: Texture and detail recovery. The Texture slider in Lightroom (not Clarity, which introduces haloing) enhances the fine detail in basalt rock surfaces and the structure of mossy surfaces without affecting the smooth water negatively. Set Texture at +15 to +30, applied selectively via a radial or linear mask that covers the rocks and foreground but excludes the water.
Step 5: Green channel management. Iceland’s waterfall surroundings are frequently intensely green — moss, lichen, ferns — in a way that can look over-saturated in RAW files even at default settings. In the HSL panel, reduce Saturation specifically in the Green and Yellow-Green range by 5–15 points. This produces a more natural-looking green that still reads as vivid without the artificial neon quality that appears in over-saturated Iceland waterfall photographs.
Cropping for vertical format: Many Iceland waterfall photographs default to horizontal. Consider vertical (portrait) crops for tall waterfalls like Skógafoss and Dynjandi — the full height of the falls is visible in a vertical composition without needing to include distracting foreground space. Print-oriented photography especially benefits from vertical formats.
Seasonal variation at Iceland’s waterfalls
Iceland’s waterfalls change character dramatically across the year, and understanding these variations helps choose the right season for specific photography goals.
Spring (May–June): Maximum water volume from snowmelt combines with returning light. Waterfalls that are merely impressive in summer are thunderous and spray-intensive in May and June. Dettifoss at peak spring flow is a fundamentally different subject than the same falls in September. The downside: Iceland’s spring weather is unpredictable — cold snaps and late snow are possible. For photographers seeking raw power and volume, late May to mid-June is peak.
The vegetation has not yet reached full green — the landscape around waterfalls has a fresh, emerging quality with pale green shoots and late snow patches on surrounding hills. This transitional quality is distinctive and worth capturing.
Summer (July–August): High water volume continues from glacial melt. Green vegetation is at its most intense. The midnight sun allows photography at any hour, but the pale night sky means long exposures at waterfall locations require strong ND filters even at midnight. For the classic silky waterfall shot, you need a 10-stop ND filter at noon in July. The advantage: no constraints on timing and maximum daylight for accessing remote locations.
Tourist volume at accessible waterfalls is highest in July and August. Seljalandsfoss at 10:00 in July has 100+ visitors. Dawn and late evening are the only practical photography windows.
Autumn (September–October): The combination that most landscape photographers consider optimal: reduced crowds, returning autumn colour, still-high water volume from summer glacial melt, and increasingly dramatic sky conditions. The golden hour is warm and long. The first autumn storms produce dramatic cloud formations around waterfalls. Water is still at reasonable volume — not peak spring levels, but substantially higher than deep winter.
Skógafoss in the late afternoon in October with warm side-light on the falls and the Skógar river valley turning autumnal: this is one of Iceland’s most compelling waterfall photography scenarios.
Winter (November–March): Lower water volume (some smaller falls freeze partially or entirely), but ice formations, frost patterns, and frozen spray around the falls create photographic subjects that summer cannot offer. Skógafoss develops impressive ice columns on its cliff face in January. Seljalandsfoss freezes around its edges, creating ice frames. Svartifoss in Skaftafell has the basalt columns decorated with frost crystals in cold snaps.
Winter access to waterfalls requires checking road conditions. The path behind Seljalandsfoss closes when icy. Dynjandi in the Westfjords is inaccessible in winter due to mountain road closures.
Combining waterfall photography with hiking
Some of Iceland’s most rewarding waterfall photography is accessed on foot rather than from roadside viewpoints. The hike-and-shoot combination produces images with different perspectives and typically less crowded foregrounds than the standard roadside views.
Skógafoss to Fimmvörðuháls: The trail that begins at Skógafoss climbs alongside the cliff and follows the Skógar river upstream past 26 smaller waterfalls before reaching the Fimmvörðuháls plateau and lava fields. Each of the smaller cascades is a separate photography subject, and the elevated perspective looking back down toward the coast — with the main Skógafoss visible far below — is only available to hikers. The full trail (to the plateau) is 8 km one-way with 1,100 m of elevation gain; shorter out-and-back walks of 2–3 km still access multiple upstream falls.
This trail is documented in detail in the Fimmvörðuháls hike guide.
Hengifoss trail (East Iceland): The 5 km round-trip hike to Hengifoss passes Litlanesfoss with its basalt column frame — a 20-minute walk from the car park — and continues to the 128-metre main falls. The hike involves moderate elevation and some steep sections. The payoff is a waterfall location that sees a fraction of the visitor numbers of South Coast falls.
Svartifoss in Skaftafell: The 45-minute walk from Skaftafell visitor centre to Svartifoss is Iceland’s most architecturally distinctive waterfall hike. The basalt column cathedral framing is visible only from directly in front of the falls at moderate distance — a position only accessible on foot. The trail continues to a higher viewpoint that offers a downward perspective on the falls and surrounding lava landscape.
Dynjandi approach walk: The parking area for Dynjandi is 20 minutes below the main falls. The path rises steeply through five named smaller cascades — Hundafoss, Hrísvaðsfoss, Kvíslarfoss, Strompgljúfrafoss, and Göngumannafoss — each a separate waterfall subject before the main 100-metre fan-shaped falls. Carrying a tripod on this approach is strongly recommended, as the smaller falls on the ascent are excellent long-exposure subjects in their own right.
For hikers combining photography with trekking, the Laugavegur trek passes through some of Iceland’s most photogenic highland waterfall scenery and includes several dramatic canyon falls accessible only from the trail.
Frequently asked questions about waterfall photography in Iceland
Can I photograph Icelandic waterfalls from inside the water (underwater photography)?
Iceland’s glacial meltwater is extremely cold — 2°C to 5°C year-round. Standing in the pools at the base of waterfalls is not safe for extended periods. Underwater photography in Iceland’s rivers requires dry suits. This is not a practical option for general travel photography.
What hours are Iceland’s waterfalls accessible for photography?
All major accessible waterfalls are open 24 hours — they are natural features on or adjacent to public roads. The visitor centres and carparks may have posted hours, but the falls themselves are always there. Dawn (before the carparks fill) is the optimal access window in summer.
Is a 6-stop or 10-stop ND filter more useful in Iceland?
For Iceland’s overcast conditions, a 6-stop ND (ND64) is more versatile. Many Iceland waterfall shots can be taken without any ND filter in overcast light. When an ND is needed, 6 stops is usually sufficient to reach a 1–4 second shutter speed. A 10-stop filter is necessary primarily for bright midday conditions — carry both if weight allows, prioritise the 6-stop if choosing one.
Can I use a smartphone for long-exposure waterfall photography in Iceland?
Smartphones can capture long exposures using built-in slow-shutter modes (ProRAW on iPhone, Pro Video on recent Samsungs). Without a tripod, you cannot hold a phone steady for 1–3 seconds. A small smartphone tripod mount (GorillaPod or similar) makes this practical. Results are acceptable for social sharing; professional-quality prints require a dedicated camera.
Frequently asked questions about Long-exposure waterfall photography in Iceland
Do I need an ND filter for waterfall photography in Iceland?
In bright midday conditions: yes, a 6-stop or 10-stop ND filter is necessary to achieve exposures of 1+ seconds without overexposing. In overcast light (very common in Iceland), you can often achieve 0.5–1 second exposures without any ND filter at f/11 and ISO 100. In low-light conditions (early morning, late evening, winter), no ND filter is needed.How long should my waterfall exposure be?
The 'right' exposure length is subjective. 0.5–1 second produces a slightly softened water texture that still looks naturalistic. 2–4 seconds produces a fully silky smooth effect. 15–30 seconds (if achievable) produces an almost misty, featureless water trail. Most successful waterfall shots use 1–4 seconds. Experiment — your first exposure is rarely your best.Which tripod is best for Iceland waterfall photography?
A tripod rated for wind with a sturdy ball head. In Iceland's conditions, a travel tripod under 1.5 kg will vibrate in wind. Carbon fibre tripods in the 1.5–2 kg range with an Arca-Swiss-compatible head are the standard choice for travel photographers. Hang your camera bag from the centre hook for added ballast in wind. Extend legs to minimum necessary height — lower is more stable.What is the best waterfall in Iceland for photography beginners?
Skógafoss is the best starting point. It is tall enough to fill the frame, the mist zone is manageable, the path to the base is obvious, and both a flat ground-level view and an elevated viewpoint are accessible. The waterfall faces roughly south, making midday light less ideal but golden-hour light very good.How do I deal with water spray on my lens at Icelandic waterfalls?
Keep a dry microfiber cloth in your outer pocket and wipe the front element before every exposure. For heavy spray zones (Skógafoss base, behind Seljalandsfoss), use a lens hood to reduce direct spray impact. A camera rain cover keeps the body dry. Check your lens before triggering the shutter — a single water droplet on the front element produces an obvious blur spot.Is a polarising filter useful at Icelandic waterfalls?
Yes, particularly useful at waterfalls with wet surrounding rocks. A circular polariser (CPL) removes the white glare from wet basalt and lichen, revealing the underlying green and black colours. It also saturates water colour in river sections. A CPL absorbs approximately 1.5–2 stops of light, reducing the need for a separate ND filter in some conditions. Use it before your ND filter in a filter stack.
Top experiences
Best-rated activities across GetYourGuide and Viator.