Photographing Jökulsárlón: a practical guide for obsessive amateurs
Four visits, two years, one location
Most travel photography happens in passing — you stop at a waterfall, shoot for 20 minutes, drive on. My relationship with Jökulsárlón glacier lagoon has been different. I’ve now visited four times: once in August 2018, twice in October 2019 and 2020, and once in January 2022. Each time I was there for at least three hours, and twice I stayed overnight nearby to catch different light conditions.
I am not a professional photographer. I have a mid-range mirrorless camera (Sony A6400), a couple of lenses, and a solid tripod. I’m interested in getting better images than phone snapshots, not in producing gallery-worthy prints. If that’s your level, this is written for you.
Why Jökulsárlón works so well photographically
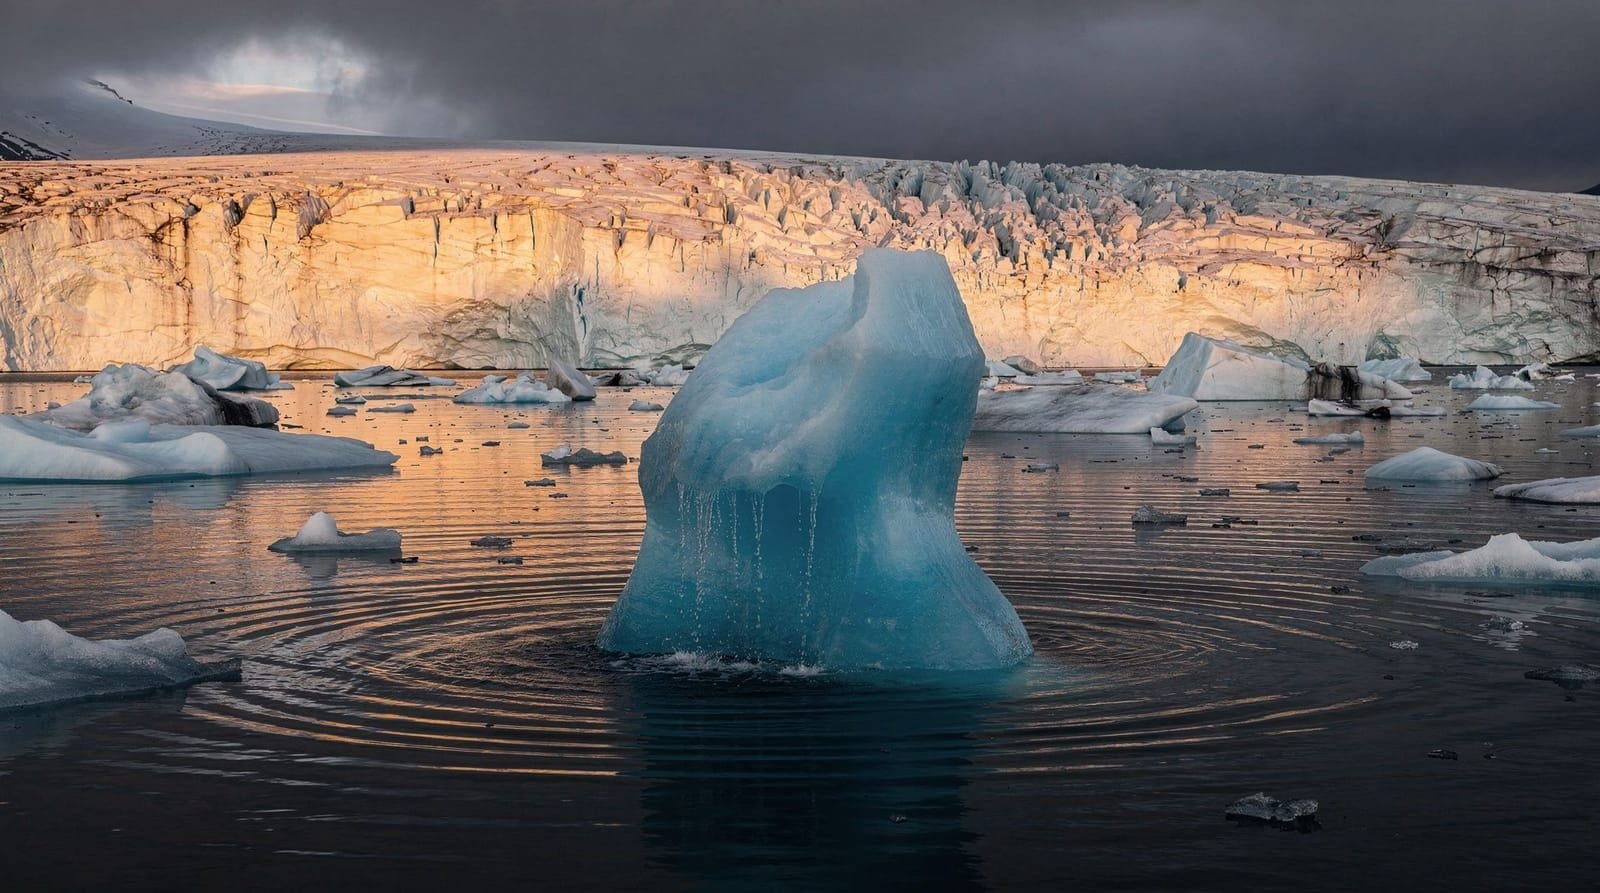
Jökulsárlón is photogenic for several overlapping reasons. The icebergs are translucent in a specific frequency-dependent way — they absorb red wavelengths more than blue ones, so the colour of ice that has been compressed under a glacier for centuries is genuinely, optically blue. This is not a filter effect. It’s physics. In certain light conditions, the blue is startling.
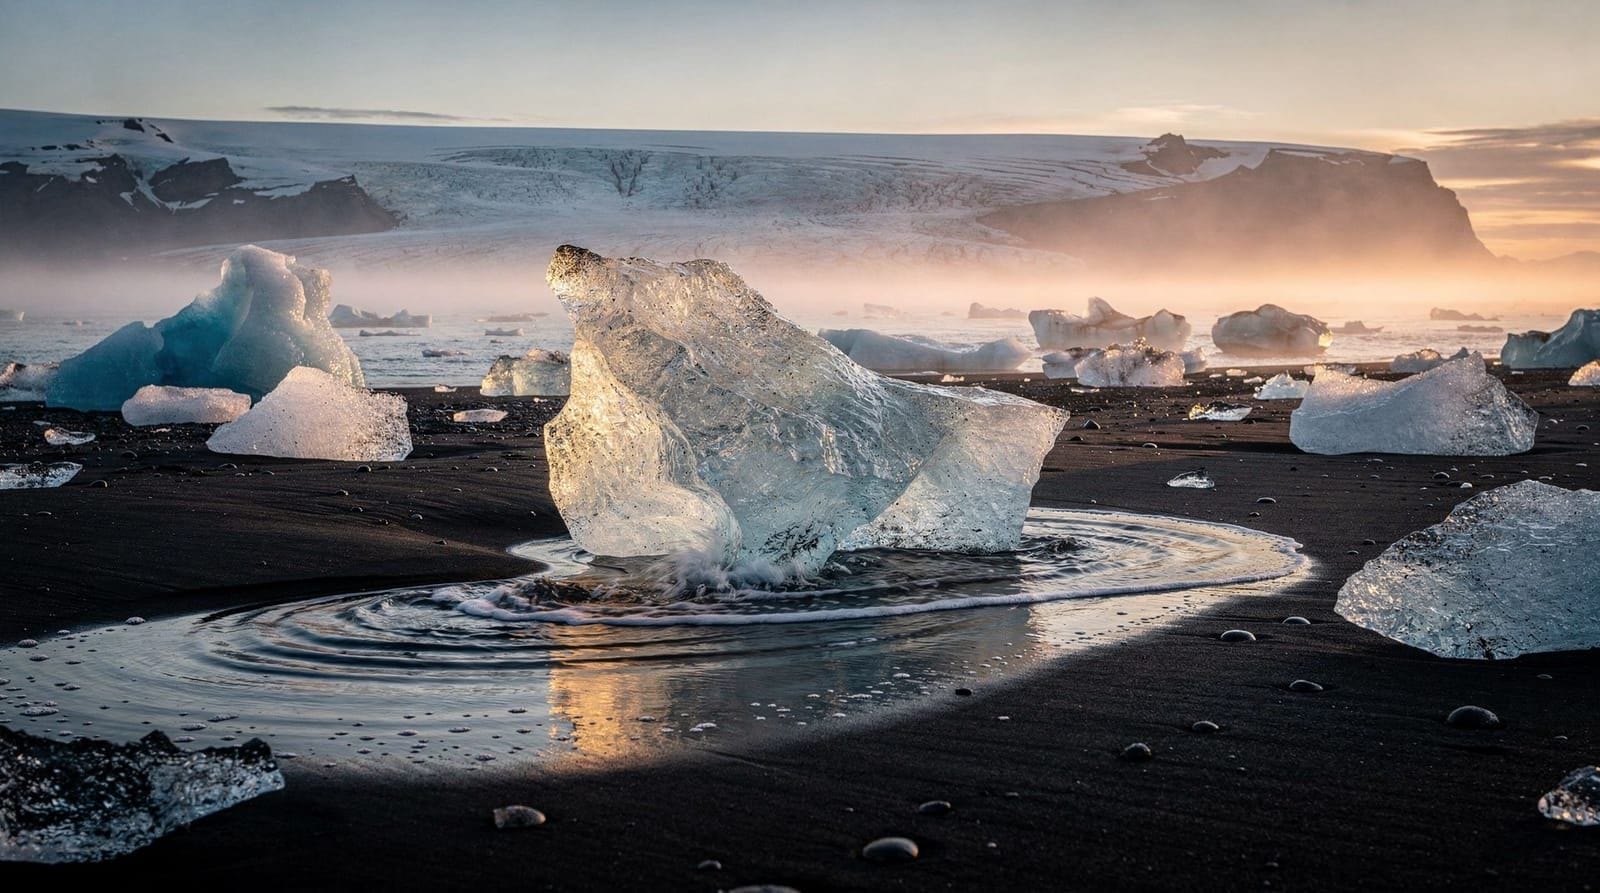
The Diamond Beach across Route 1 adds the second element: stranded ice chunks on black volcanic sand, constantly reshaped by wave action. The contrast between white/blue ice and black sand gives you graphic images in almost any light. Even a phone camera handles it well.
The lagoon itself works differently — softer reflections, moving bergs, and the opportunity for long exposures that smooth the water into a mirror surface.
Timing and light
Early morning in summer (June–August): Arriving before 7 am gives you the lagoon with minimal crowds. In midsummer, the sun at 5–6 am hits from a low angle from the northeast, raking across the ice surface. This is high-contrast, hard light but creates strong shadows in the crystal structures. The crowds start arriving around 9–10 am when coach tours come from Reykjavik.
Golden hour in autumn (September–November): October is probably the best overall month for photography. There’s still enough daylight to work with (sunrise around 7:30 am, sunset around 6:30 pm by mid-October), the light stays low and warm for extended periods, and the crowds are smaller. I’ve had October mornings at Jökulsárlón with only four or five other people visible on the entire lagoon shore.
Winter (November–February): Shorter daylight means the sun stays low all day — effectively permanent golden hour quality for the 4–5 hours of usable light. Snow on the surrounding mountains adds context. The lagoon may have more ice than summer because calving has had months to accumulate without the warmth breaking smaller pieces down. January 2022 had the lagoon more densely packed than any previous visit. The cold is real: dress seriously.
Overcast days: Not wasted. Flat light on ice shows texture and detail that direct sun blows out. Some of my favourite shots from October came from overcast mornings when the blue of the ice was most saturated.
Specific shooting positions
The main viewing area (north shore): Where the car parks are. Gives you the standard view — lagoon, icebergs, mountains in the background. Useful. Also used by every other photographer.
The channel mouth (east side): The glacial river channel where ice exits to Diamond Beach is on the east end. From the banks here, you can photograph bergs moving outward to sea, and sometimes seals sitting on the ice. The seals are seasonal (more common in winter) and do not guarantee appearances.
Diamond Beach (south side, across Route 1): Cross the road and walk to the beach. The ice chunks vary enormously from day to day depending on what’s washed in. On a good day — after a storm has broken large bergs into photogenic pieces that haven’t yet been washed back — the beach is extraordinary. On a quiet day, there might be three medium pieces and a lot of black sand. Worth checking both sides of the beach (east and west of the river mouth).
The bridge: Route 1 crosses the channel on a bridge. Standing on the bridge itself to photograph is illegal and genuinely dangerous — it’s a main road with fast traffic. Don’t. But from the car park immediately east of the bridge, you have a different angle on the channel flow.
East lagoon (lesser-visited): A smaller section of the lagoon is visible from a pullout about 800 metres east along Route 1. Few people stop here. Different composition angle.
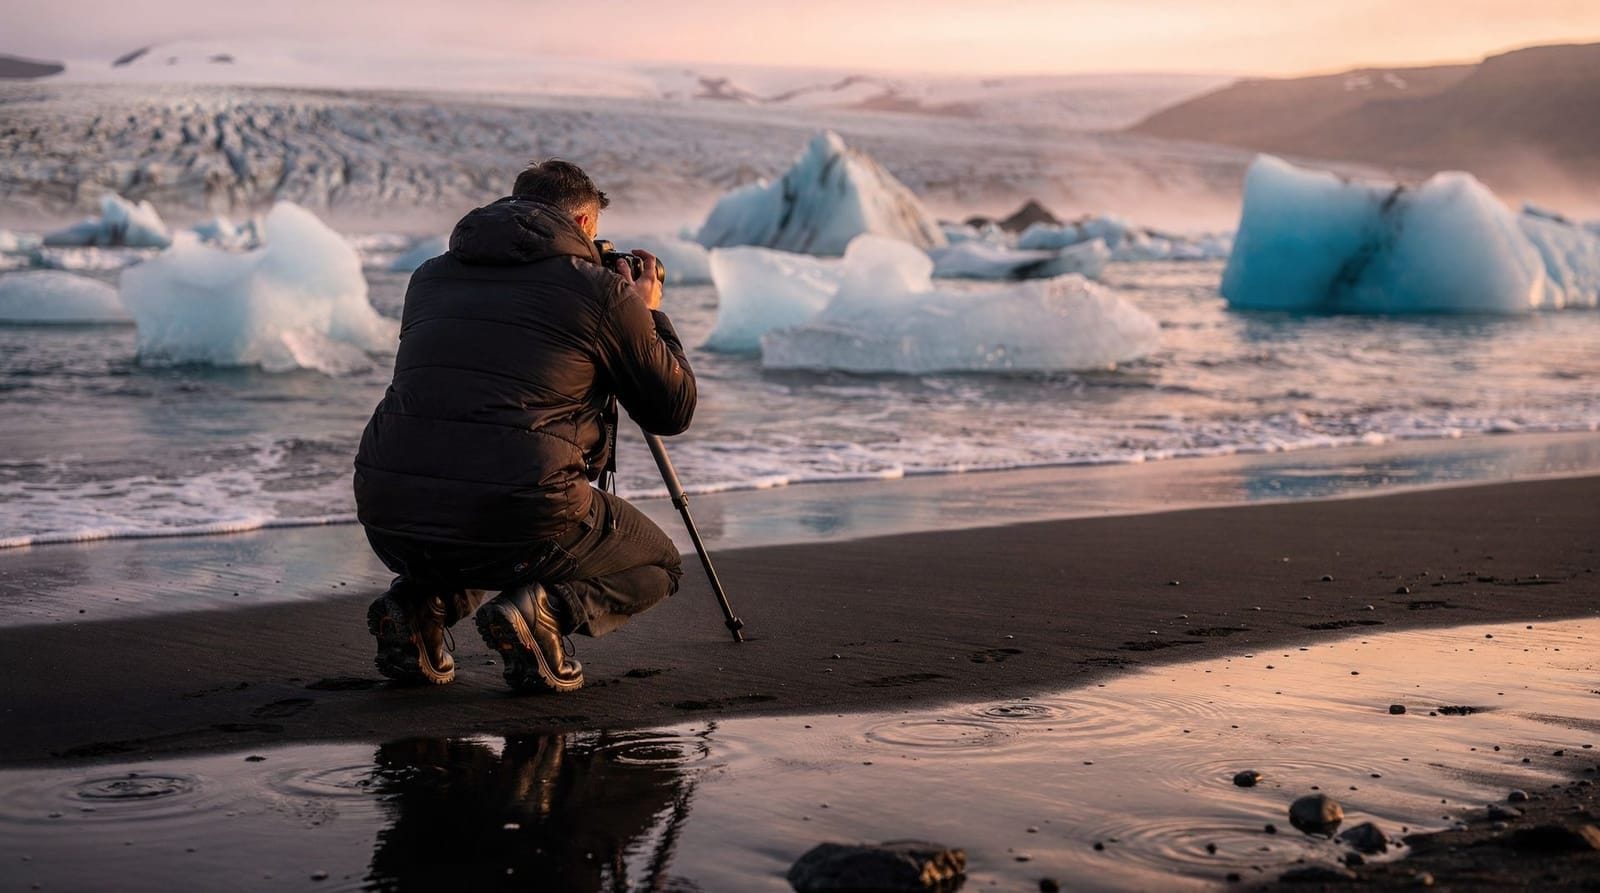
Gear and settings
Tripod: Non-negotiable for long exposures. The ground near the lagoon is often uneven and marshy — bring leg extenders or accept wet feet.
Long exposure: For the lagoon, 4–8 second exposures at f/11–f/16 and ISO 100 smooth the water and capture berg movement as gentle motion blur. For Diamond Beach, long exposures can flatten wave action interestingly. Bring ND filters for daytime long exposures.
Polariser: Cuts reflections on wet ice and deepens the blue on sunny days. Useful but not essential.
Focal length: I use a 16–50mm equivalent for wide lagoon scenes and a 55–210mm for compressing bergs against mountain backgrounds and for details in ice texture.
Cold battery management: Lithium batteries lose charge faster below 0°C. Keep a spare battery in an inner pocket. In January, I went through two full charges in three hours.
The boat tour question
The amphibious “Glacier Boats” tour lets you get close to the icebergs from water level, which is visually spectacular. The tour costs around ISK 7,000–8,000 (€44–50) per person and runs in summer only. From a photography perspective, you can get closer to ice formations and shoot looking up at bergs from water level, which is not possible from shore.
Private tours to the lagoon and Diamond Beach allow more flexible timing than standard tours — useful if you’re specifically trying to catch a particular light condition and don’t want to be locked into group departure times.The honest assessment: the boat tour is enjoyable but the photography angle from a moving boat with other passengers around you is complicated. Shore-based photography is actually more controllable. I’ve done the boat once; I don’t think I’d do it again specifically for the photography.
What disappoints
Two things I should be honest about: The tourist infrastructure at Jökulsárlón has grown substantially in recent years. The main car park has a large café/souvenir building, charging infrastructure, and in summer handles hundreds of people per hour. Finding a position on the north shore without other tourists in frame requires patience and usually early arrival.
Diamond Beach’s “best conditions” are unpredictable. I’ve visited when it was stunning — large, sculptural ice pieces with interesting forms. I’ve also visited when there were perhaps six modest pieces and the visual impact was ordinary. You cannot control this. It’s worth visiting regardless because even a quieter day at Diamond Beach is still a dramatic landscape.
The half-day extension: Skaftafell
Skaftafell, inside Vatnajökull National Park, is 45 minutes west of Jökulsárlón on Route 1. If you’re spending a full day at the lagoon (which justifies itself if you’re there for photography), the afternoon can be extended to Skaftafell for a glacier hike approach and the Svartifoss waterfall trail.
Skaftafell’s glacier face is accessible on foot — a 45-minute walk from the visitor centre across outwash plain takes you to the margin of Falljökull glacier. You cannot walk onto the glacier without a guide and equipment. But standing at the ice margin, looking at a glacier wall three storeys high, is its own significant experience.
For the photography: the glacier margin in late afternoon light — especially in autumn, when the surrounding birch trees are turning yellow — offers a completely different colour palette from the lagoon. Blue ice and black moraine with yellow birch in the middle distance. I haven’t seen this specific combination reproduced well in other people’s Iceland photography, which suggests it’s undershot.
The technical specifics I’m always asked about
My most-used settings at Jökulsárlón over four visits:
For the lagoon (long exposure): ISO 100, f/14, 6 seconds. ND1000 filter in midday light to achieve this in summer. Pre-dawn and post-sunset, no ND needed.
For icebergs in natural light: ISO 400, f/8, 1/250s in overcast conditions; ISO 100, f/11, 1/500s in direct sun. Expose for the ice highlight rather than the sky — it’s easy to blow out the white ice structure.
For Diamond Beach: ISO 200, f/11, 1/60s on a typical overcast October morning. Polariser reduces reflections on wet surfaces and deepens the blue of ice pieces in diffuse light.
For seals: These appear at the channel exit, usually in winter. You need something with reach — 200mm equivalent minimum. Seals in grey-scale tones against the black sand and white ice create a naturally high-contrast monochrome composition that works better in black and white conversion than in colour.
For more Iceland photography locations, the best photo spots guide covers more than 20 locations around the country, with optimal timing for each. The Iceland photography guide has equipment and technique specifics for the Icelandic environment. The long exposure waterfalls guide covers technique for running water, which applies to the outflow channel here as well.
Jökulsárlón is not a one-visit location. It earns multiple trips, different seasons, different conditions. I’ll go back.